I FileMaker finns nedrullningsbara listor vars innehåll definieras med en värdelista. De ser alla likadana ut, varför inte göra en egen variant? I det här exemplet tänker jag kombinera Sök med SQL med en popover och några manus-triggers. Resultatet blir en nedrullningsbar lista (även kallat dropdown-meny) med eget utseende.
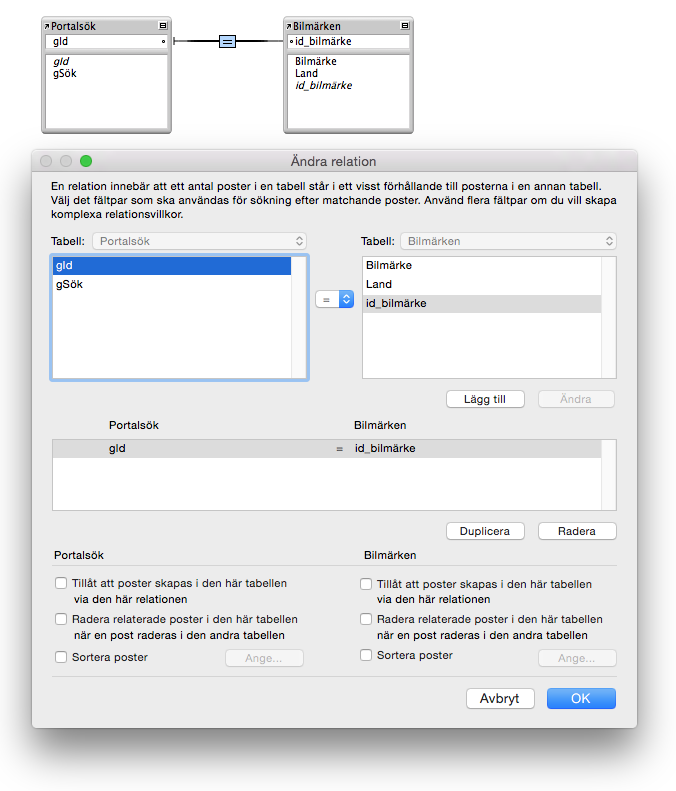
Jag utgår från exempeldatabasen från Sök med SQL och behåller både sök-manus och portal. I det här exemplet vill jag sätta in ett värde i fältet Bilmärke (ett nytt fält jämfört med exempeldatabasen), värdet väljer jag från en nedrullningsbar lista.

När jag skriver i fältet Bilmärke reduceras bilmärkena i listan precis som tidigare. Det nya är att jag kan trycka Pil ner respektive Pil upp för att markera ett bilmärke i listan. Vill jag välja det markerade bilmärket trycker jag på Retur. Manus-trigger med piltangenterna har jag tidigare skrivit om här.
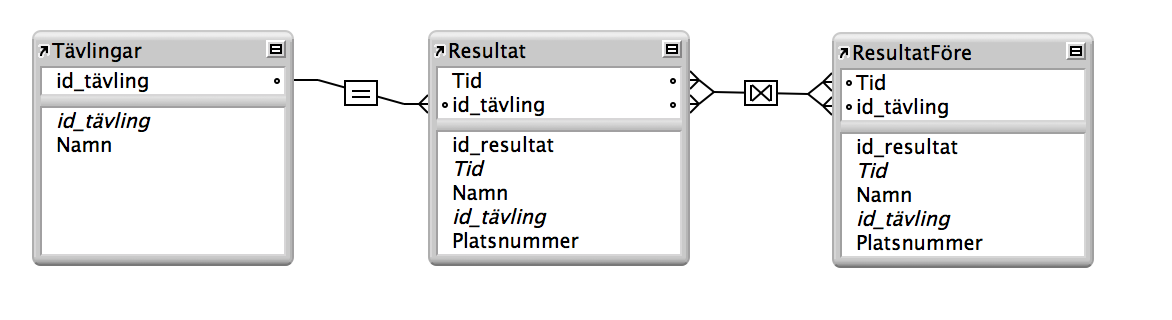
Det första jag gör är en popover med portalen som visar resultatet av sökningen. Jag gör popoverns bakgrund genomskinlig och döljer knappen som öppnar popovern. Det gör jag med funktionen Dölj objekt i Granskaren. Jag markerar knappen och skriver “1″ i fältet för Dölj objekt. Det betyder att knappen alltid är dold i bearbetningsläget, men syns i layoutläget.
I popovern placerar jag också en kopia av fältet Bilmärke och ser till att de båda fälten Bilmärke placeras på exakt samma plats, dvs. både det som finns i popovern och det som visas på layouten utan popover. Planen är att det inte ska märkas att användaren byter från det ena fältet till fältet i popovern.
Jag gör en trigger som startar när jag klickar i fältet Bilmärke (utanför popovern), det startas VidObjektÖppna. Manuset ser ut så här:

Jag tar reda på var användaren klickar i fältet, utför sökningen så att listan visar de bilmärken som början med det som skrivits i fältet redan, går till objektet med namnet “bilmärke_fält” som är fältet i popovern samt sätter tillbaka markören på samma ställe. Jag namnger fältet i Granskaren och använder Gå till objekt istället för Gå till fält eftersom FileMaker då mycket väl kan gå till det andra bilmärkesfältet, det utanför popovern, och det vill jag inte. I och med att jag går till ett objekt som finns i en popover visas den.
Med två andra manus tar jag hand om piltangenterna. Det första ställer jag in så att det utförs VidObjektTangenttryckning på fältet Bilmärke (i popovern).

Om Pil ner markeras den första portalraden, om Retur stängs popovern. Alla övrig tangenter skickas vidare till fältet, t.ex. bokstäver.
Det andra ställer jag in så att det utförs VidObjektTangentTryckning på hela portalen i popovern.

Om Pil ner markeras nästa rad i portalen, om Pil upp markeras raden ovanför. Om första raden redan är markerad går FileMaker till sökfältet igen. Om användaren trycker Retur väljs bilmärket, det sätts in i fältet Bilmärke och popovern stängs.
Du kan ladda ner exempeldatabas här: Rullistasok.fmp12


 Processing a test payment